

- SEARCH
-
Purchase CardCart
( 0 )
My Purchase Card
0 ITEMS IN YOUR BASKET
Lithograph Overview
A
Practical Guide -Identification and Plating of the India 1854-55 Lithographic
Printings 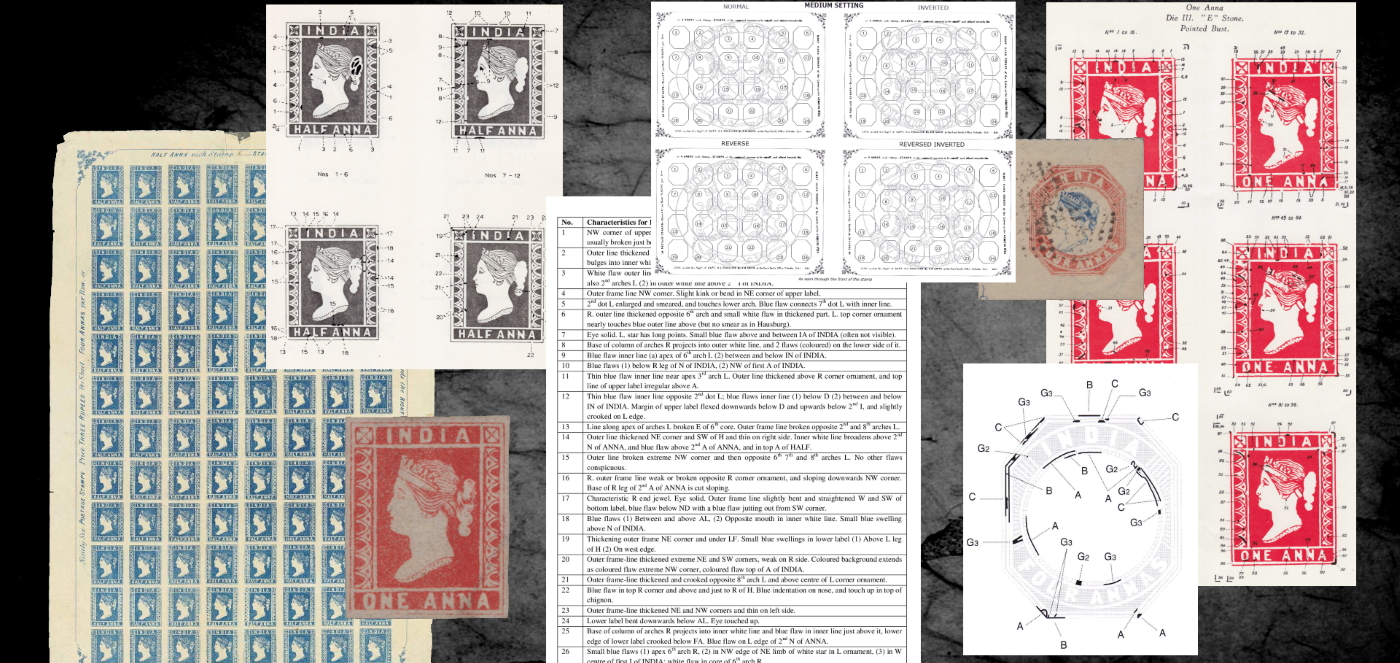
Perhaps only a small number of active philatelists today are able to comprehensively plate early Indian 1854-5 lithographic stamps. This section is intended to be a genuinely �practical guide� on how to correctly identify, and begin plating these lithograph printings. The endeavour will also explore the specific aspects involved in dealing with each of the �a � 1a � 4a values. I want to try to impart the considerable practical experience gained from a fervent pursuit attempting to plate thousands of lithographs during the last decade. There is no intention to profess any real expertise on the subject. In fact, I suspect that barely any such philatelists exist in the modern era. Rather, my aim is merely to illustrate how to apply any available research, mainly published by long past experts with a few exceptions, so that any enthusiast can start identifying and plating their own 1854-55 lithographic material.
This guide will be made as straightforward as possible, to help collectors quickly grasp the practicalities of identifying and plating these fascinating individualistic stamps, without initially becoming unnecessarily bogged down needing to absorb too much initial information, except where felt absolutely necessary to aid the process. So the guide will remain singularly focused upon tackling the practicalities of getting the identification and plating done, and not much more. This very pragmatic approach will help with those initial steps to identify and plate any material already present in someone�s collection.
I suspect today few people actively plate their own Indian 1854-55 lithograph stamps, because the initial requirement necessary to learn how is a multi-faceted task, and often time consuming to do so. A collector might start out with considerable enthusiasm, only to become less so when trying in earnest, due to the combined aspects involved in the process adding up to an early complexity. In my view, there are two main reasons for this initial hindrance.
Firstly, despite the fact that the elementary concise information on die characteristics is a readily available reference on the three values, in an attempt to simplify identification, inadvertently it initially only slightly complicates comprehension. When someone lacking experience tries to identify a die type, they often struggle as the choice of standardised characteristics for each die can vary a little and be ambiguous rather than of absolute fixed design. Therefore, the combination of chignon, corner ornaments, band below diadem, diadem and jewels, outer frame lines characteristics, can add up to a lot of variability, if unfamiliar.
Past philatelists whom originally studied the extant material and extensively published largely between 1927-49, noted down these die characteristics in such a concise way in order to help the enthusiast. Today on each value, this same standardised format is found in the footnotes of SG Commonwealth catalogue. Despite this concise approach between various aspects of design, the variable comparative indicators can nevertheless confuse the inexperienced before they have properly begun.
Therefore, my suggestion is that on each lithographic value � half anna, one anna, and four anna � with each recognised die, a single primary characteristic indicator is focused upon to make any initial identification. This narrowed approach then simplifies the preliminary recognition problem of a die in most instances, helping to gain a better foundation, and start plating the stamps. Only after this singular approach proves uncertain for a given stamp, should secondary characteristic indicators be brought into the equation. This is a practical methodology that works, in my experience.
Secondarily, another initial key difficulty in the plating of each value, is variable access to the required information in each case. Usually pictorial plating diagrams and descriptive plating lists are used for each die and subsequent printing stones. To know what and where all the relevant information is to be found, is a practicality rather than complexity. Obtainability varies greatly on each value, for the key text extracts describing different stones, better standardised die diagrams, plating tables and pictorial plating guides etc. Some required aspects are fairly accessible due to more recent reprints of far older publications, while some salient elements needed can be almost impossible to find. Even if you could readily access all the required information, how might a relatively inexperienced person know what practical elements to utilise when trying to plate the material, without needing to begin a considerable research project? If an enthusiast need to do a lot of reading and note taking, even before successfully plate a single stamp, might this become off-putting.
Besides familiarisation the necessary nomenclature, this practical guide aims to make available all the necessary reference and textual material to plate the 1854-55 lithographs, and no more. With this reduced approach, one relatively inexperienced can then begin more quickly to correctly identify and plate each lithograph stamp they have to hand, in most instances. Therefore, the methodology of learning the absolute minimum required is employed to achieve the task, and not be put off at an unnecessarily early stage.
After having had a few practical early successes at plating, perhaps then it is more likely one might absorb additional aspects of the process, and be enthused enough to further read the related literature. Then study more nuanced elements beyond the basics to plate, such as sheet reconstruction, or even sub-stone reconstruction, learning to differentiate touch-ups from retouches, recognising characteristic shades of a die, or becoming ofay with the lithographic printing process itself. In my view, the most important aspect of all is in understanding the progressive nature of wear in the lithographic process that led to the existing recognised dies, stones, and sub-stones.
Essentially there are two distinct levels of operation in this lithographic endeavour � either a more simplified pragmatic applied one, or an advanced, contributory to the field level. This somewhat contrasting binary choice I feel is due to the fact that the overall state of research is still considerably varied on the plating of each value, with subsequent parent stones (setting) from each die, and especially sub-stones. Comprehension of the different aspects on each lithographic value still ranges from fairly comprehensively understood, to not yet researched, or barely understood.
This current state of affairs makes applying such research to any given lithographic material variable in difficulty, depending on the given value, die, stone, even sub-stone (sub-setting). Often the dearth or abundance of established research is dictated by the material extant on a given stone, or in other words its availability due to scarcity.
However, the fact of the matter remains that despite these inherent inconsistencies, and various more advanced aspects to contend with, it is still possible on the half, one, and four anna lithographic values, to plate the vast majority of material to some extent, and it is hoped even for the relative beginner using this guide! The specifics in identifying and plating each of the three values, will be put into sub-sections, and later discussed in more detail.
General
Practicalities
The fact is on certain lithographic stamps, mostly single examples, the pursuit of trying to plate them can sometimes drive a person slightly insane. Fortunately, this is the case with only a relatively small number of instances, probably less than five percent of those stamps encountered. It seems that with a scarce few, no matter how much experience you possess, or how good your die or stone recognition is, one can still not properly identify them, let alone successfully plate them. Despite any amount of effort, sometimes no particular Die (or distinct parent stone), nor stone (distinct setting), or even discernible watermark (can depend on value), or any single plating flaw, can be categorically verified. To even begin the process of plating those few trickiest of examples can seem impossible, no matter how expert you are!
In great contrast to the above troublesome types, sometimes you can simply hold a given lithograph up to light, and easily discern its watermark element, and so where that might fall on the sheet, using a commonly available overlaid watermark positional diagram. You can now easily surmise a sheet position, and with the easiest stamps quickly determine a clear-cut die (parent stone). If a half or one anna value, then lastly when you look for specific recorded flaws they are quickly discovered, and everything is corroborated. The entire straightforward task not taking much effort or time! Perhaps this type accounts for an estimated ten to twenty percent of instances encountered.
Perhaps about 80% of lithographic material falls
somewhere in-between, when one initial aspect or element of identification
might be established, such as Die, or watermark, or even ink shade in some
cases. On these more typical examples, it is important to get a foothold, or to
�break in� as it were, to its possible identification. It is a rewarding
surprise when you find just one aspect to aid you, such as an ambiguous
watermark element, and how it can then lead to the discovery of another
indicator, like a single plating flaw. Suddenly everything becomes apparent,
like the die and stone type. After successfully plating the stamp, you look
back to that initial seemingly ambiguous watermark indicator that is now so
obvious to your newly elucidated eyes!
Watermarks
Certain philatelists who like to plate stamps suggest the first thing to check on a stamp is for watermark. When plating, checking for any visible watermark is an obvious first step, which can sometimes bring instant clarification. It is essential therefore to have the correct diagrams of sheet watermark overlaid with sheet positions, appropriate to each value and setting or spacing.
All half and one anna sheets of 96 have paper with
the �Arms� Watermark No: 4�, its default orientation being sideways to the
watermarked design. Download watermark diagram applicable to lower values. [Download 1] On the four anna value the
same watermark is used, but the paper size was reduced, so the stamps overlaid
only the central oval portion, irrespective of which spacing, with the
peripheral wavy lines found on the lower values trimmed. The four anna default
sheet watermark orientation is sat upright to the stamps.
As there are three differently spaced stamps on a
sheet; as follows: 1st, 2nd, and 3rd Printings
are wide spacing 12 stamps to sheet [Download 2], 4th Printing close spacing [Download 3] and
5th Printing medium spacing [Download 4]
The watermark will sometimes be visible, sometimes not, depending on sheet position. With the half and one anna, even stamps without any visible watermark can reduced a stamp to only twenty possible blank positions of a sheet � not accounting for shifted watermarks due to paper misalignment. Why certain watermarked examples are far easier to detect than others, remains unknown to me, as a well suited standardised paper produced in England originally for fiscals was used for lithographs during this period. A certain few examples seem to even have a bold watermark, so much so they show slightly on the face of a stamps, or are easily visible on scan. This visible variability of watermark often effects the initial determination of what position on the sheet a stamp might fall.
Usually the best way of discern a watermark, to help determine what sheet position it falls, is by holding up a stamp offset to natural light. Quite frequently the watermark can appear vaguer to varying degrees, which sometimes needs the aid of a decent watermark detector with adjustable pressure, to help visibility. This is not always a perfect solution, but in many cases it at least enables detection of a sheet watermark motif element well enough to get an appreciation of what position it might possibly be. Sometimes using a detector in combination with other means like holding up, can give enough recognition of a watermark design element, to at least make a start in surmising potential sheet positions.
Other watermark detection methods that I have found helpful are, holding a stamp up indirectly to natural light, and continuing to change the angle until something comes to sight, or using instead a specialised lamp LED, used in professional craft and sewing. Another slightly counterintuitive approach is to simply put a stamp down flat on a darker surface with back facing up. At certain times of the day in varying overall conditions, this can yield a better perspective of a troublesome watermark than using light.
A key practical aspect to realise is that if there is a watermark component present, and you fail to detect it despite serious effort, this can lead you astray, cause frustration, and waist a lot of time. Unfortunately, some examples are far more difficult than others to detect any visible, even if one is there. Even when using a detector, it can seem very ambiguous. In these most troublesome instances, using the watermark as a secondary detection process can be more beneficial in the eventual recognition. For instance, if you feel a stamp might be a certain die, and you have a few possible plating flaw candidates from differing positions, you might then bring in the troublesome watermark into the equation at a later stage in your plating process to help corroborate your initial findings. Then sometimes a the once ambiguous, or previously non-visible watermark can suddenly show itself, or become clearer, because prior to looking you might already have a good idea of what to expect! In this way, a previously difficult watermark can become gleaned, or an uncertain watermark can seem more evident, and even help to verify the plating and die!
Another significant factor in watermark detection
is to ascertain the orientation. There are four possible watermark variations
i.e. upright, inverted, reverse, and inverted & reversed, and although
upright is most common, the other three orientations are not uncommon either.
Despite this potential complication, due to symmetrical nature of the watermark
design, if a central portion or a curved outer fame element is detected, this
then reduces the possible sheet positions to just four on most, and eight on
just a few outside. When checking a half or one anna for instance, if you see a
watermark position that might be 17 or 65 in the upright position (see
diagram), then you might check for die plating flaws on those, firstly
presuming their upright orientation. If nothing is found, but the watermark
element seems quite clear, then you might proceed to check positions 24 or 72
reversed, then 25 or 73 inverted, then 32 or 80 inverted & reversed, until
you find a corroborating plating flaw. This is a more complex edge of sheet
example. On most sheet positions the permutations are 4 or less, especially if
a secondary watermark detail is also visible, such as part of a letter, or some
less common aspect not replicated elsewhere. On the four anna value, with a smaller
part of the watermarked sheet used, and reduced number of stamps on each,
watermark detection and orientation is less complex.
One final complicating factor on these 1854-5 lithographic printings is the occurrence of shifted watermarks, which in most cases will be fairly minor, but sometimes can be notable to the extent that sheet position 69 determined by plating might show the watermark of position 70, or 77, depending on the direction of shift. This degree of shift is uncommon, but a watermark perhaps one third and two thirds across two sheet positions is more common. This scenario though, then requires additional positional checks. Watermarks can be shifted towards the cardinal points N, S, E, W, and in-between directions, NW, NE, SW, SE. As above, mostly a watermark is only shifted slightly, and commonly is a straightforward affair to ascertain sheet position from the watermark. Only very occasionally the shift can be considerable � to the point where it is overlaid on an adjacent sheet position, or moved to the sheet margin without watermark.
These potential combined complicating factors of watermark detection might seem like difficult obstacles sometimes to the point of impossibility, even in conjunction with other identifying aspects. However, it�s encouraging to remember that only a small number of examples suffer with such difficulties, and most watermarks are quite discernible, if not easily recognised at first. Where a stamp lies on a sheet usually fairly closely approximates to the actual sheet position determined by plating flaws. Please remember, merely by holding a stamp up to a light, many watermarks are fairly obvious after a little effort, perhaps with the aid of a detector.
Die Identification
The listed Dies on each of the three lithographic values are as follows:
- Half Anna � Die I (A-B stones + 6 rare sub-stones) Die II (C stone) Die III (D stone).
- One Anna � Die I (A-B stones), Die II (C-D stones), Die III (E stone).
- Four Anna � Head Die I (1st Printing) Die II (2nd & 3rd Printing) Die IIIA (3rd Printing) Die III (3rd Printing, 4th Printing, 5th Printing (slight variation)).
What is a die in early Indian lithographic printing? Put in basic concise terms, it is the design of the stamp engraved in reverse on a copper plate that then gets transferred directly on to an especially suited stone, hence the term lithography. The lithographic stone has an extensive absolutely plane surface made of very fine grain, in order to replicate the many finessed details of the design. This very first transfer made is an actual die, and would be called Die I and usually Stone A. When the first stone wears due to constant or repetitive use, a stone might then be recut and named Stone B. Only when the printers felt it necessary to create a new stone directly from the copper engraving, is a new die created. This would then be called Die II Stone C, etc., and then be a new parent stone.
On each lithograph value the listed dies and
resulting parent stones, even sub-stones, come into being in a specific order,
mostly due to the progressive wear, relating to the practicalities inherent in
the lithographic printing method. There is much to learn about the many nuances
involved in the actual printing process, but a more selective understanding of
such will be of great benefit. A visual recognition of �progressive wear�
encountered on the fine-grained lithographic stone, helps tremendously in
identifying a particular die, and in fact differentiating most other aspects relating
to plating. One example of this understanding is whether a given die is at an
early, middle, or late state of wear.
In general, the various die of each value are recognised by certain key design characteristics. A simplified reference is available that describes those common characteristics of each die, which are thought helpful to collectors, especially those still quite inexperienced. Such design features assigned to a given die however can have varying degrees of consistency on the same individual sheet position. Detail can weaken or quickly disappear, especially finer definition initially visible in the early state. Occasionally standardised characteristics of a given die can overlap with those similar on another die. Other facets of printing, such as over-inking and under-inking, or more advanced printing elements such as touch-up and retouches, can all influence the identification equation.
Hence why it is not always clear on say the four anna value, whether the red octagonal frame is Die I or Die II. Or on the half anna, why due to progressive wear, certain Die I examples can overlap in appearance with Die II characteristics. Once more practiced after having looked at many more examples of the same die, their identification can then become a less dogmatic affair, and more based on a kind of dynamic pattern recognition of the general standardised die characteristics. With experience the more constant design elements or characteristics, depicted in various diagrams for each die (see downloads in specific value sections), gradually become more distinguishable.
The most crucial practical point is to learn what is the most constant design feature on each die, which might be termed as a �primary die characteristic�, before you seek the aid of any mostly less consistent �secondary die indicators. In my view, these more secondary die characteristics listed concisely in the literature, only create variables that unintentionally confuse or complicate the initial identification process. Recognition of these most constant characteristics found in almost every instance, but never all, then dramatically helps die identification in most cases. This is because a more narrowed simplified initial approach is more likely to bring success. Although there is a slight controversy around the very notion of a constant in lithography itself, due to the many variables involved in the actual printing process, here we are discussing the most constant or fixed element that is not absolute.
In my view, virtually all primary die characteristics on all three lithograph values, and on all subsequent dies, mostly relate to specific upper chignon definition, and sometimes its interconnection with back of head. This methodology of identification might be a little controversial, but the fact is on most dies, this more singular narrowed initial approach identifies ninety percent plus of Indian lithographic stamps, before the need to consult other secondary factors. Naturally each lithograph value has its own specific considerations, as some secondary characteristic indicators a more constant than others, or even as reliable as the chosen primary indicator. To reiterate a primary die characteristic is the one most constant of all, but still not absolutely constant in every instant.
An unusual example of a die with multiple primary indicators is the One Anna Die III, or the so called �pointed bust� die�, as it has several easier to discern more constant characteristics, including a very reliable vertical red line drawn below the eye, or a �teardrop eye�! Even when both these constant features are obscured by heavy postmark, nevertheless the distinct heavier fuller centralised upper chignon definition, as a part of the suggested identification methodology, is still present. The chignon was more boldly re-engraved in reverse on the copper, for the creation of Die III, and therefore also a reliable primary characteristic indicator. It is distinctly different to the chignon definition of Die II, even though both have a white separating line from the head hair. However, usually dies have a single standout primary indicator is the norm.
Very occasionally uncharacteristic die types are
encountered, then perhaps even experts might have trouble immediately
identifying them. Only in these more exceptional cases do the more consistent
secondary characteristics in combination play a more important role for initial
identification, rather than later corroboration. Uncharacteristic die types are
somewhat scarce, and are a resultant of various other factors relating to the
lithograph method of printing, such as fading due to more notable wear, or key
obscured features from over-inking, or very occasional mechanical printing
process errors, or camouflaged by later touch-ups or retouches, mistaken for constant
die characteristics.
Parent Stone Flaws
What is a �Parent Stone�? It is the initial transfer of the stamp design taken directly from an engraved die that can then be used to print. If after some time when this parent stone is adjusted or altered by necessity, then it becomes transposed into another parent stone, even though not directly changed from the original engraving or die. Hence on the half anna for example you get Die I � A then B stone, then Die II C stone, Die III D stone. Parent Stone B is created from A, whereas Parent Stone C and D are both created from separate dies.
This transition or rather progression between stones, and the reason why they are created by adjusting particular details of an existing design, gives an improved understanding of what key characteristics differentiate the various stones of the same die. A gradually developed better visual recognition of progressive wear, and which parts of the parent stone design are most constant (as with a die), and which are more prone to wear or to gradually fade, or where on the design touch-ups or retouching are most likely required, all help initial identification in a less dogmatic or fixed way. To develop a dynamic pattern recognition of such nuances is key to becoming more adept at identifying the parent stones of the early Indian lithographs.
Mostly the parent stones on the half and one anna values quite well understood, but not entirely and to varying degrees. They were researched and referenced for plating at a workable level mainly in the later 1920s and 1930s. However, overall this is not the case for the four anna value. Only the more complex third printing, incorporating three separate head dies, has been extensively researched for frame plating flaws, and even then the plating of every sheet position is by no means comprehensive on every stone so far recognised. On all other four anna printings no research is published on the plating of them, and only an approximation of the number of stones likely to exist is mentioned.
Order of Plating
If on a given stamp the die type is clear, as is the probable watermark position, then using the descriptive plating tables, and any pictorial plating reference available, helps to verify the exact parent stone in question, and the exact sheet position. These will be downloadable in the section specific to each value. Diagrams visually show the flaws and where they lie, and the descriptive table for each stone giving sheet position mostly corroborate, but not entirely. Sometimes a descriptive plating flaw is not found on a diagram, or a visual plating flaw is not mentioned on the descriptive table. When used in conjunction both resources often clear any ambiguity.
Certain other stamps for practical reasons might need a change in the order of the plating process. You might firstly notice a single flaw and then find that on either the pictorial or descriptive reference, therefore potentially quickly establishing the parent stone before even watermark detection or die identification. Next finding a watermark or indeed no watermark might corroborate with the initial plating flaw find, and the die characteristics fit. Often though the sequence of recognition in the plating process is in another order. More usually you would look for a watermark if a fairly distinct element is seen, then this usually reduces the probable sheet position to one of only four, except for some blank, or edge of sheet examples. Next one might determine the probable die using the pattern recognition of die characterises you may have developed, ensuring the example is one or two possible stones. Finally, studious study of the plating stone flaws present might categorically resolve the sheet position, corroborating with all the other combined factors discovered.
The most difficult stamps to identify or plate, are usually singles where an initial entry point of recognition cannot be found. Perhaps no discernible plating flaw on a certain sheet position is present, or only one ill-defined plating flaw is worthwhile considering, but only creates further ambiguity. Other obscuring factors might be over-inked or worn state examples, or stamps with a badly positioned PM obscuring any key primary die characteristics and helpful plating flaws. This is why a flexible approach is sometimes required, to gain a start in working out identification. On a given stone and sheet position, if a key plating flaw is obscured then hopefully another is visible. Or an over-inked example might still show the primary die characteristic coupled with a quite discernible watermark, even if the plating flaws are obscured in a sea of ink. Very �worn state� examples for instance are often difficult to properly plate, when some of the evidence needed has disappeared. Nevertheless, a watermark element and a distinct shade characteristic of a certain die or stone, still might be enough to gain an inkling, so that later in the investigation you might be fortunate enough to suddenly gleaned a previously unnoticed speck of ink that is a remnant of a once more obvious minor plating flaw.
Attempts at more advanced entire sheet
reconstructions of a certain stone, using connecting or overlapping strips or
various multiples � being the key methodology involved � is what aids
researchers create a reliable descriptive plating table, or pictorial plating
diagram. Collectors might then later study their work, and fathom how to plate
one of their stamps from that same stone. This kind of more laborious sheet
reconstruction work is especially valuable, when complete sheets or even larger
multiples are no longer extant. At this more advanced level, creating your own
reference, it is still required that you can differentiate between parent stone
flaws and touch-up and retouches, which requires a considerable familiarity
with the lithograph material.
Shade Spectrum
One underutilised aspect of die or stone identification is the overall shade characteristics encountered on different printings. It is logical that dies printed at slightly different periods might have variations of typical or non-typical shades. This is also the case when comparing different stones from the same die, which can be printed a month even months later, obviously produced on an entirely separate printing run. Therefore, while dies and stones do have a shade spectrum that partially overlap, their epicentre of what is typical or less common can be distinct, even contrasting. Certain shades found on a die or stone, might even be absent on another. Therefore, shade recognition can sometimes be a useful initial indicator in identification, if you develop some appreciation of what is more typical to each die or stone type. Shade is an especially helpful facet when used in conjunction with other factors.
Even the concise SG listings of the four anna 1855 third printings recognise that the red frames are �often in bright shades�. This shade attribute is a reasonable initial indicator to warrant further checking of a candidate third printing example. Another case is the SG listed SG6 half anna Die II blue shade, which mostly tend to be deeper than those with the same shade description encountered on Die I listed SG2. Examples are most often darker or less bright, perhaps closer the SG4 Deep blue shade of Die I. Half anna Die II shades that are mid-range blue are less common, and paler examples are at least scarce. On certain printing stones deeper or duller shades are more common than others. Sometimes pale instances are more common, but on another stone of the same die might be scarcely encountered.
The leading philatelists from the past active
before the war, recognised a more defined shade listing for each die or stone
type, on all three lithographic values, as listed in the Specialised Catalogue
of Early India Lithographs 1854-1855 Dawson L.E., & Smythies E.A, pp26:
1933 2nd Ed. These extended shade listings were later simplified
when published in SG catalogues, and still prevail today. Simplified shade
definitions in my view can sometimes be unhelpful in aiding the correct
identification and plating, as is the case with these 1854-55 lithograph
issues. Obviously, too many shade definitions can unnecessarily complicate
matters, yet conversely the recognition of too few can be a lost aspect to help
identification. These additional shade definitions will be noted in the
specific section for each value
Introduction :: Half Anna :: One Anna :: Four Anna :: Biblio/Other


